Greetings:
I just purchased a B847 Century motor to replace our old motor that had a bearing going out. Using the Inyo Pool guides, I was pretty easily able to remove the old motor, attach the exiting parts to the new motor, and get everything put back together. I took note to document the wiring as I went, and wired the terminals to their matching numbers on the old motor.
Once I had everything together, I filled the pump with water, turned on the breaker, and switched on the pump. The motor hummed, and I could feel it vibrate, but it was not turning the shaft. I turned it off, and with my hand, was able to turn the shaft, so it does not appear to be stuck.
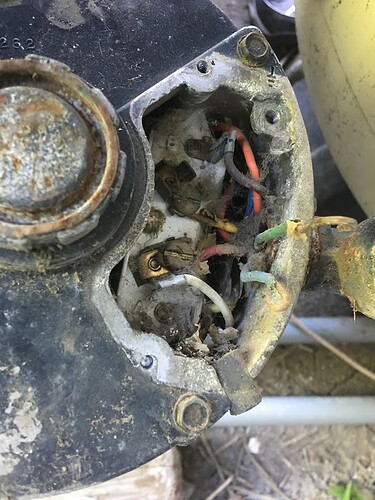
I’m wondering if I wired somethign wrong. Here’s a picture of the wiring in the old motor:
In case you cannot tell, there are four wires coming into the pump:
- green (ground)
- red (attached to L2)
- blue (capped in the motor)
- yellow (attached to L1)
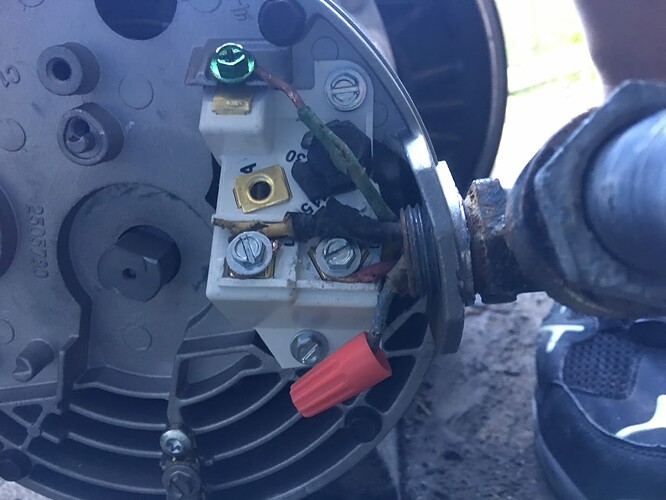
In the new motor, I wired it the same way:
- greem (ground)
- red (attached to L2)
- blue (capped)
- yellow (attached to L1)
Here’s a picture, though it’s a bit hard to see the colors:
Any idea what is going on? The wiring was pretty simple, so about the only thing I could have screwed up was reversing the red and yellow wires.
Thanks,
Eric
Hi Eric,
Do you have any way of testing the motor on 115v? The wires look pretty bad. Sometimes that can cause what your describing.
Thank You
Patrick
www.inyopools.com
Patrick:
I do have a multimeter, so I can test to see what is coming from them. Based on what I’ve read, if it is on 230v, I should be getting 115v across both wires, correct? Short of that, I’m not sure how to test it on 115v. Would I just take an old extension cord, clip off the female end, attach the wires, and plug it in? If so, what wires would I attach where?
With respect to the wires themselves, I agree, they were not in the best condition, and I plan on replacing them, but needed to get it up and running, as we are hosting swimming lessons throughout the week. I will test them with the multimeter to see if there are any issues.
All of that said, based on a bit of research, it seems that this behavior may also be indicative of a bad capacitor. If that is true, would I be voiding the warranty by taking the capcitor from the old motor and trying it on this one? I’ve had a couple of friends with experience on electrical motors suggest this, given that the previous motor worked fine in this setup, save for the bad bearing.
Thanks,
Eric
Eric,
You can do whichever approach is easiest for you either replacing the capacitor or wiring 115V, if you did replace the capacitor that would not affect your warranty as this is a unique situation.
As far as the 115V goes yes you could use just a basic extension cord, you should have 3 wires… one wire will go to Line 1 (L1) one wire will go to Line 2 (L2) and the green wire will go to the ground terminal. For the L1 and L2 connection, it does not matter which wire goes to which terminal.
If the capacitor fixes the issue then the issue was a bad capacitor. If wiring 115V fixes the issue then it seems as the old wires are bad.
Please let us know what transpires and if we can help in any way.
Thanks
Patrick
Patrick:
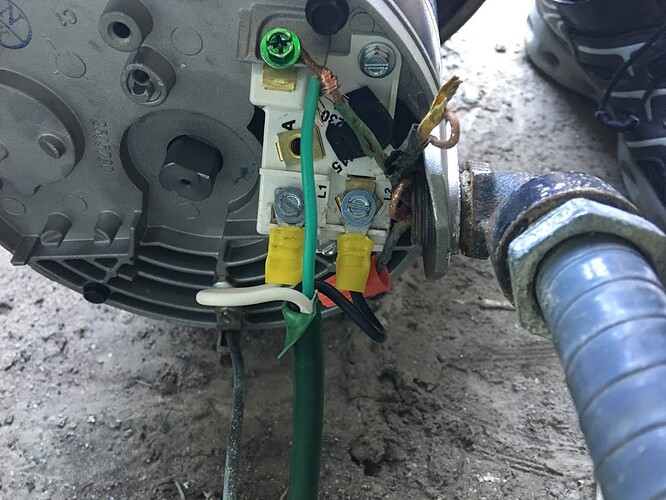
I tried both solutions and determined it was the capacitor. I first wired the pump per your instructions and plugged it in. It did the same thing as it did on the previous wiring: just hummed and did not turn. Here’s how I wired it:
So, I next pulled the capacitor from the old motor–shorting it first–and replaced the new capacitor with it. Bingo. Worked on 115V, so I hooked it up to the old wiring and it continued to work. It’s so dang quiet, I didn’t think it was working at first, so that was pretty impressive.
That said, how do I go about getting a replacement capacitor, since I just received the motor yesterday and it is, I assume, brand new?
Thanks!
Eric
I’m glad you were able to get this to work and I’m sorry that the first capacitor was bad. Yes, this was a brand new motor but sometimes components are bad out of the box. I will get you a new replacement capacitor shipped out A.S.A.P. and thanks so much for your patience!
Thanks for sending the replacement! It was definitely a learning experience. I am now emboldened to see if I can replace the bearings in the old motor to have it as a backup.
You’re more than welcome, I’m getting 2 sent out so you have a backup. If you decide to replace your bearings we have a two part video on how to do it.
Pool Motor Bearing Replacement Video - Part 1
Pool Motor Bearing Replacement Video - Part 2


